Overview
Over the past few years, OpenStack has demonstrated increased maturity, dependability, and usability as a primary choice for private cloud deployments. As OpenStack becomes increasingly adopted in enterprise environments, problems that have been addressed in other ecosystems are starting to emerge as new challenges for OpenStack. In this post, I’ll show you how NetApp’s data management technology can help solve challenges related to taking and maintaining backups of a user-provisioned Cinder volumes environment when using a NetApp Data ONTAP® storage system as a Cinder backend.
Cinder deployments can contain large numbers of Cinder volumes, where individual Cinder volumes can be 100GB or larger. Customers are looking for options to quickly and efficiently perform backup and recovery of these block storage volumes to address business, application or regulatory compliance requirements. Some compliance policies would require the management and execution of backups by the administrators of an OpenStack private cloud. In other situations, the business units protocol dictates that backups be executed outside of the application tier to meet the requirements of their company. NetApp’s Data ONTAP technology including NetApp Snapshot copies and SnapRestore® can be used to efficiently backup and restore Cinder data without user intervention.
Leveraging NetApp Snapshots and SnapRestore to backup and restore data within Cinder volumes
Nearly all storage vendors offer snapshots; however NetApp Snapshot copies are more space and time efficient than those available by other vendors. While Cinder exposes a tenant facing backup service that allows tenants to control their backups, it has several limitations for OpenStack deployers.
Please note: As we use the term snapshot in this post, please do not confuse it with a Cinder snapshot. In this post, we will only be referring to NetApp Snapshots.
A NetApp Snapshot copy is a read-only image that captures the state of the file system at a point-in-time. Low-overhead NetApp Snapshot copies are made possible by the unique features of the WAFL storage virtualization technology that is part of Data ONTAP. The high performance of the NetApp Snapshot makes it highly scalable. A NetApp Snapshot takes only a few seconds to create — typically less than one second, regardless of the size of the volume or the level of activity on the NetApp storage system. They allow you to vastly improve the frequency of the backups you require, reduce the time required to create the backup, and provides efficient storage utilization for backups. After a Snapshot copy has been created, changes to data objects are reflected in updates to the current version of the objects, as if NetApp Snapshot copies did not exist. Meanwhile, the NetApp Snapshot version of the data remains completely stable. A NetApp Snapshot incurs no performance overhead; users can comfortably store up to 255 NetApp Snapshot copies per FlexVol volume, all of which are accessible as read-only and online versions of the data.
NetApp offers a unified Cinder driver for OpenStack, which allows you to leverage features of clustered Data ONTAP as well as Data ONTAP operating in 7 mode. When using NetApp’s Cinder driver, a Cinder volume is represented as either a file on NFS or an iSCSI LUN; this means that a FlexVol volume will contain many Cinder volumes. Since NetApp Snapshots are taken at the FlexVol volume level, an individual NetApp snapshot will contain a point-in-time view of what the Cinder volumes looked like within that FlexVol volume.
Note that you can define a snapshot policy within Data ONTAP to schedule snapshots and apply retention policies. An administrator can define a Snapshot policy and schedule to implicitly create the Snapshot copies for the FlexVol volumes supporting your Cinder backend. Data ONTAP provides a default Snapshot copy policy for each FlexVol volume. Unless you specify a Snapshot policy when you create the FlexVol volume, the FlexVol volume will inherit a default Snapshot policy. For example, the default Snapshot policy will automatically create one daily Snapshot copy Monday through Saturday at midnight, an hourly Snapshot copy five minutes past the hour, every hour, and a weekly Snapshot copy. The default schedule is defined to retain the two most recent daily and weekly Snapshot copies, as well as the six most recent hourly Snapshot copies. You can also create Snapshot policies with different schedules and retention if the default policy does not meet your requirements. You can have multiple Snapshot policies, and assign the appropriate policy to the NetApp FlexVol volume supporting a Cinder backend. For example, there could be a policy to retain 8 hourly Snapshot copies and 6 daily Snapshot copies.
For more information on how to create Snapshot policies, please refer to the Clustered Data ONTAP Data Protection Guide within the Data ONTAP Clustered Documentation on the NetApp Support site.
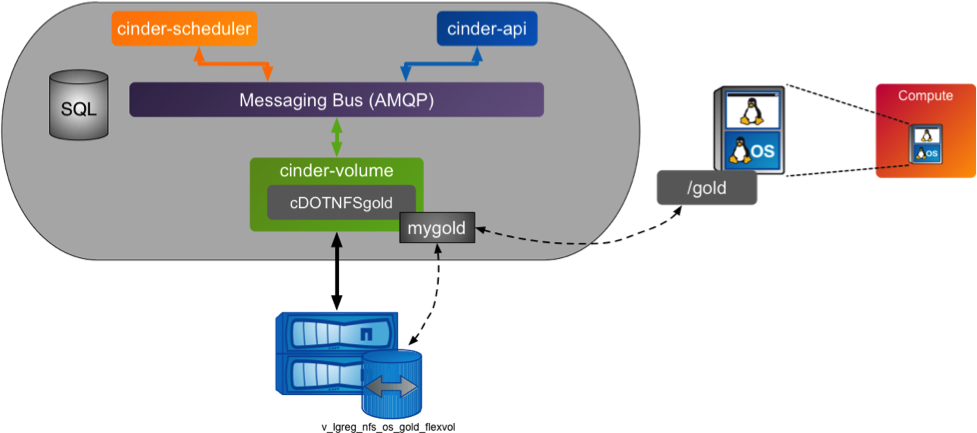
To demonstrate use of NetApp Snapshots, I created a simple DevStack environment with Cinder configured with one backend. This backend is backed by a NetApp FlexVol volume that is mounted via NFS to the node running the Cinder services. In this example, we will use the Cinder backend gold, which is supported by a NetApp FlexVol volume named v_lgreg_nfs_os_gold_flexvol. We have created a Cinder volume named mygold, and attached that to our Nova instance. Within this instance, this Cinder volume is configured and mounted as the /gold file system. See the figure below for a representation of the test environment for this use case.
One of the features you can use within a Cinder environment is NetApp Snapshots, which can be leveraged to backup the FlexVol volume that supports a Cinder backend. In this example, you can periodically backup the FlexVol volume named v_lgreg_nfs_os_gold_flexvol with a Snapshot copy. This NetApp FlexVol volume is the NFS file system, supporting the Cinder backend of cDOTNFSgold. The Snapshot copy can be created either via a predefined schedule/policy where the Snapshot copy is created implicitly for you; lternatively, the Snapshot can be created explicitly for a single FlexVol volume or a series of Flexvol volumes via a command line, API, or other NetApp management interface. We will create the Snapshot explicitly in this example shown below.
You should keep in mind that this will create crash-consistent backups. A crash consistent backup is where you capture the state of the FlexVol volume at a point in time. This means that the applications or VM have not been been quiesced. This type of snapshot is typically good for stateless, applications that are read intensive, or even databases in some situations. If you need application consistent backups, then you may need to quiesce your application as an additional step prior to creating the Snapshot. These types of backups require some additional planning to coordinate with the virtual machines and the applications running in them. Application consistent backups can easily be automated within a workflow if they are required.
The diagram below illustrates the FlexVol volume, v_lgreg_nfs_os_gold_flexvol, with multiple Snapshots.
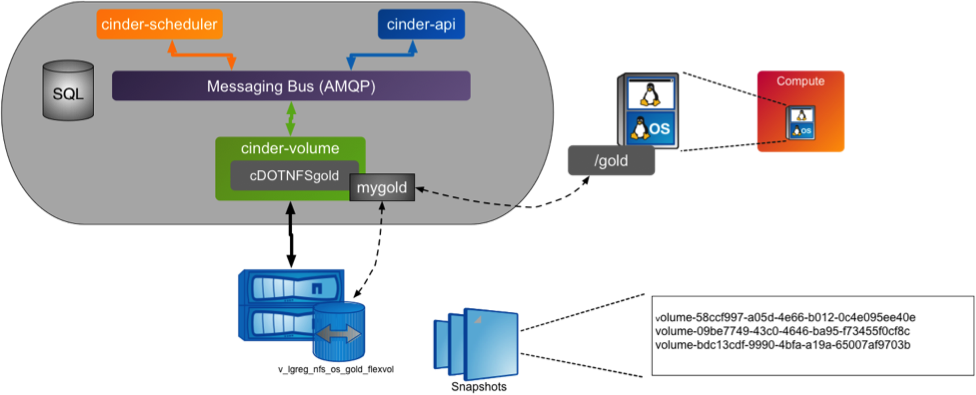
In this example, you can see that there are three Cinder volumes illustrated for our Cinder backend. These are individual files within the file system supported by the FlexVol volume. Each Cinder volume, or file, will in turn be a block device presented to an OpenStack VM. The size of each Cinder Volume within the FlexVol volume will not have any impact on the time it takes to create the NetApp Snapshot. Snapshots allow administrators to create instantaneous backups. It will typically be faster to create the Snapshot than the time it takes to type the command shown below!
Below are the commands to create and to validate a NetApp Snapshot for the FlexVol volume supporting the Cinder backend.
stlfas3240-23-24-cmode::> snap create -vserver v_lgreg_nfs_os_gold  -volume v_lgreg_nfs_os_gold_flexvol -Snapshot mygold_cdot_Snapshot
stlfas3240-23-24-cmode::> snap show -volume v_lgreg_nfs_os_gold_flexvol
                                                                 ---Blocks---
Vserver  Volume  Snapshot                        State        Size Total% Used%
-------- ------- ------------------------------- -------- -------- ------ -----
v_lgreg_nfs_os_gold
         v_lgreg_nfs_os_gold_flexvol
                 weekly.2015-02-15_0015          valid      1.70MB     0%    0%
                 weekly.2015-02-22_0015          valid      1.57MB     0%    0%
                 daily.2015-02-26_0010           valid       884KB     0%    0%
                 daily.2015-02-27_0010           valid       552KB     0%    0%
                 hourly.2015-02-27_0305          valid       408KB     0%    0%
                 hourly.2015-02-27_0405          valid       400KB     0%    0%
                 hourly.2015-02-27_0505          valid       408KB     0%    0%
                 hourly.2015-02-27_0605          valid       404KB     0%    0%
                 hourly.2015-02-27_0705          valid       400KB     0%    0%
                 hourly.2015-02-27_0805          valid       260KB     0%    0%
                 mygold_cdot_Snapshot            valid        68KB     0%    0%
11 entries were displayed.
stlfas3240-23-24-cmode::>
We have explicitly created a backup named mygold_cdot_Snapshot as show above. Now let’s see the impact of being able to efficiently restore the individual Cinder volume.
Restore your Cinder data
You can restore an individual Cinder volume from within the FlexVol volume as quickly as creating the Snapshot. This is an example of using the NetApp Single File Snap Restore technology to restore the complete Cinder volume. Recall that a Cinder volume is a file within the NetApp FlexVol. By executing the Single File Snap Restore, the restore will be for the entire block device represented by the Cinder volume.
From the diagram above, recall that we have a Cinder volume labeled mygold. That, in turn, is attached to my Nova instance, and mounted within the VM as /gold. A tenant has corrupted their data and needs to get the data back. Let us say they have accidently deleted some of there data within the VM, and needs this data to continue testing to prepare for a production roll out.
stack@lgregub4:~$ ssh -i lgregos.key ubuntu@10.0.0.2 ls -latr /gold
total 512544
drwx------  2 root   root       16384 Feb 26 15:35 lost+found
drwxr-xr-x 23 root   root        4096 Feb 26 15:35 ..
-rw-rw-r--  1 ubuntu ubuntu 104857600 Feb 26 15:49 testfile1
-rw-rw-r--  1 ubuntu ubuntu 157286400 Feb 26 15:49 testfile2
-rw-rw-r--  1 ubuntu ubuntu 209715200 Feb 26 15:49 testfile3
drwxrwxrwx  3 root   root        4096 Feb 26 16:04 .
-rw-rw-r--  1 ubuntu ubuntu  52428800 Feb 26 16:04 testfile4
stack@lgregub4:~$ ssh -i lgregos.key ubuntu@10.0.0.2 rm /gold/testfile1 /gold/testfile3
stack@lgregub4:~$ ssh -i lgregos.key ubuntu@10.0.0.2 ls -latr /gold
total 205036
drwx------  2 root   root       16384 Feb 26 15:35 lost+found
drwxr-xr-x 23 root   root        4096 Feb 26 15:35 ..
-rw-rw-r--  1 ubuntu ubuntu 157286400 Feb 26 15:49 testfile2
-rw-rw-r--  1 ubuntu ubuntu  52428800 Feb 26 16:04 testfile4
drwxrwxrwx  3 root   root        4096 Feb 27 13:11 .
stack@lgregub4:~$
The tenant will need to contact the storage/cloud administrator so that they can perform a SnapRestore using the Single File Snap Restore feature of Data ONTAP. This feature leverages the Snapshot that has been created, and allows you to restore a single Cinder volume quickly. Here are the steps needed to restore the Cinder volume:
- The Cinder volume (i.e. /dev/vdb, for example) will need to be unmounted from the VM
- Perform a Single File Snap Restore of the Cinder volume for that FlexVol volume
- Remount the file system associated to the Cinder volume within the VM
All of these steps can easily be automated to make this a simple task.
First, you will unmount the /gold file system within the Nova instance.
ssh -i lgregos.key ubuntu@10.0.0.2 df -kh
Filesystem      Size  Used Avail Use% Mounted on
/dev/vda1        40G  851M   37G   3% /
none            4.0K     0  4.0K   0% /sys/fs/cgroup
udev            2.0G   12K  2.0G   1% /dev
tmpfs           396M  344K  396M   1% /run
none            5.0M     0  5.0M   0% /run/lock
none            2.0G     0  2.0G   0% /run/shm
none            100M     0  100M   0% /run/user
/dev/vdb1       991M  502M  438M  54% /gold
stack@lgregub4:~$ ssh -i lgregos.key ubuntu@10.0.0.2 sudo umount /gold
sudo: unable to resolve host lgregubuntu1
stack@lgregub4:~$ ssh -i lgregos.key ubuntu@10.0.0.2 df -kh
Filesystem      Size  Used Avail Use% Mounted on
/dev/vda1        40G  851M   37G   3% /
none            4.0K     0  4.0K   0% /sys/fs/cgroup
udev            2.0G   12K  2.0G   1% /dev
tmpfs           396M  344K  396M   1% /run
none            5.0M     0  5.0M   0% /run/lock
none            2.0G     0  2.0G   0% /run/shm
none            100M     0  100M   0% /run/user
stack@lgregub4:~$
We know that this Cinder volume is called mygold. And that it can be associated with the following Cinder volume file within the file system supporting the Cinder backend:
volume-58ccf997-a05d-4e66-b012-0c4e095ee40e
This is the individual file within the file system that represents the Cinder volume that I need to restore from the NetApp Snapshot. The next step is to execute a restore of the Cinder volume. We will use the command below that exhibits the use of the Data ONTAP technology to restore that single file.
stlfas3240-23-24-cmode::> volume snap restore-file -vserver v_lgreg_nfs_os_gold -volume v_lgreg_nfs_os_gold_flexvol -snapshot mygold_cdot_Snapshot -path /vol/v_lgreg_nfs_os_gold_flexvol/volume-58ccf997-a05d-4e66-b012-0c4e095ee40e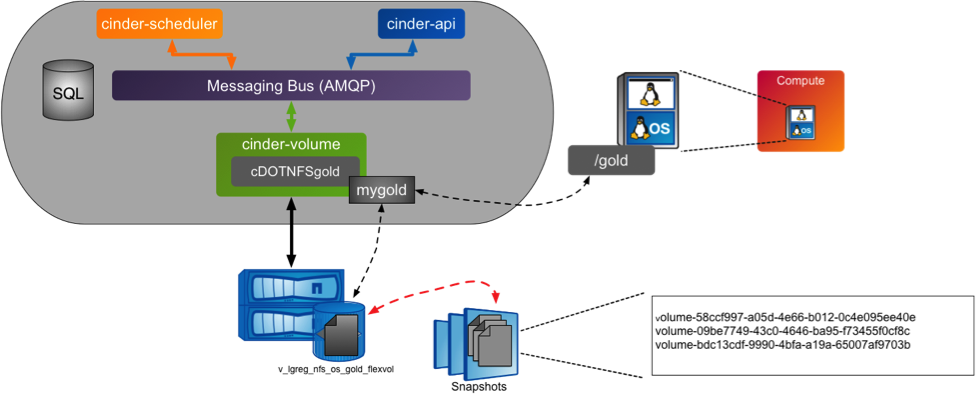
Once the restore is executed, the tenant can remount the file system and see that their Cinder volume has been restored to the point in time based on the NetApp snapshot copy.
stack@lgregub4:~$ ssh -i lgregos.key ubuntu@10.0.0.2 sudo mount /dev/vdb1 /gold
stack@lgregub4:~$ ssh -i lgregos.key ubuntu@10.0.0.2 ls -latr /gold
total 512544
drwx------  2 root   root       16384 Feb 26 15:35 lost+found
drwxr-xr-x 23 root   root        4096 Feb 26 15:35 ..
-rw-rw-r--  1 ubuntu ubuntu 104857600 Feb 26 15:49 testfile1
-rw-rw-r--  1 ubuntu ubuntu 157286400 Feb 26 15:49 testfile2
-rw-rw-r--  1 ubuntu ubuntu 209715200 Feb 26 15:49 testfile3
drwxrwxrwx  3 root   root        4096 Feb 26 16:04 .
-rw-rw-r--  1 ubuntu ubuntu  52428800 Feb 26 16:04 testfile4
stack@lgregub4:~$
Conclusion
I’ve presented a simple example of how NetApp’s Data ONTAP technology can be used to backup and restore Cinder volume data within an OpenStack deployment. Hopefully this post should open more doors for you to allow you to think outside of the box when backing up and restoring your Cinder data. To summarize some of the differentiated abilities when you need to backup and recover:
- Offload the backup activity from the OpenStack nodes to the storage.
- Create time and space efficient backup of your Cinder backends using NetApp Snapshots. This can greatly reduce the window of time required to backup the data.
- Define the use of an explicit Snapshot, as we did in this simple use case or make the use of a default Snapshot policy provided by NetApp Data ONTAP.
- Quickly restore a single file with the use of NetApp SnapRestore feature. The ability to efficiently restore the data and reduce the time a tenant waits to become operational again.
- Use of the NFS protocol for the Cinder backends. You should note the iSCSI protocol is also supported for restoring content from LUNs.
- Provide flexibility for simple recovery due to Cinder misconfiguration(s) or other OpenStack failures.
- Set the foundation for efficient replication and cloning of Cinder backends for additional use cases to meet the different SLA’s of your tenants
For information regarding best practices using NetApp storage with Cinder and other OpenStack services, see the Deployment and Operations Guide. If you have any questions, you can get in touch with us on the NetApp OpenStack Community page or join us on IRC in the #openstack-netapp channel on Freenode!