ONTAP cDOT
Prepare ONTAP cDOT cluster
NetApp Harvest requires login credentials to access monitored hosts. Although, a generic admin account can be used, it is best practice to create a dedicated monitoring account with the least privilege access.
In the examples below, the user, group, roles, etc., use a naming convention of ‘netapp-harvest’. These can be modified as needed to match your environment standards.
There are few steps required to prepare each monitored system for collection.
Harvest supports two authentication styles (auth_style) to connect to ONTAP clusters.
They are basic_auth or certificate_auth. Both work well, but if you're starting fresh, the recommendation is to
create a read-only harvest user on your ONTAP server and use certificate-based TLS authentication.
Here's a summary of what we're going to do
- Create an ONTAP role with the necessary capabilities that Harvest will use to auth and collect data
- Create a user account using the role created in step #1.
Creating ONTAP user
There are two ways to create a read-only user:
- Create a user with read-only access to all API objects
- Create a user with read-only access to only the APIs Harvest collects today
The second option has a smaller attack surface, but each time you want to collect counters for a new object, you will need to update the user's privileges.
Below we explain how to create an ONTAP user and role for Harvest using ONTAP System Manager (Classic interface & New interface) and CLI.
System Manager: New interface
Note: in this section we add a user with read-only access to all API objects. For limited access, use either the classic interface or the CLI
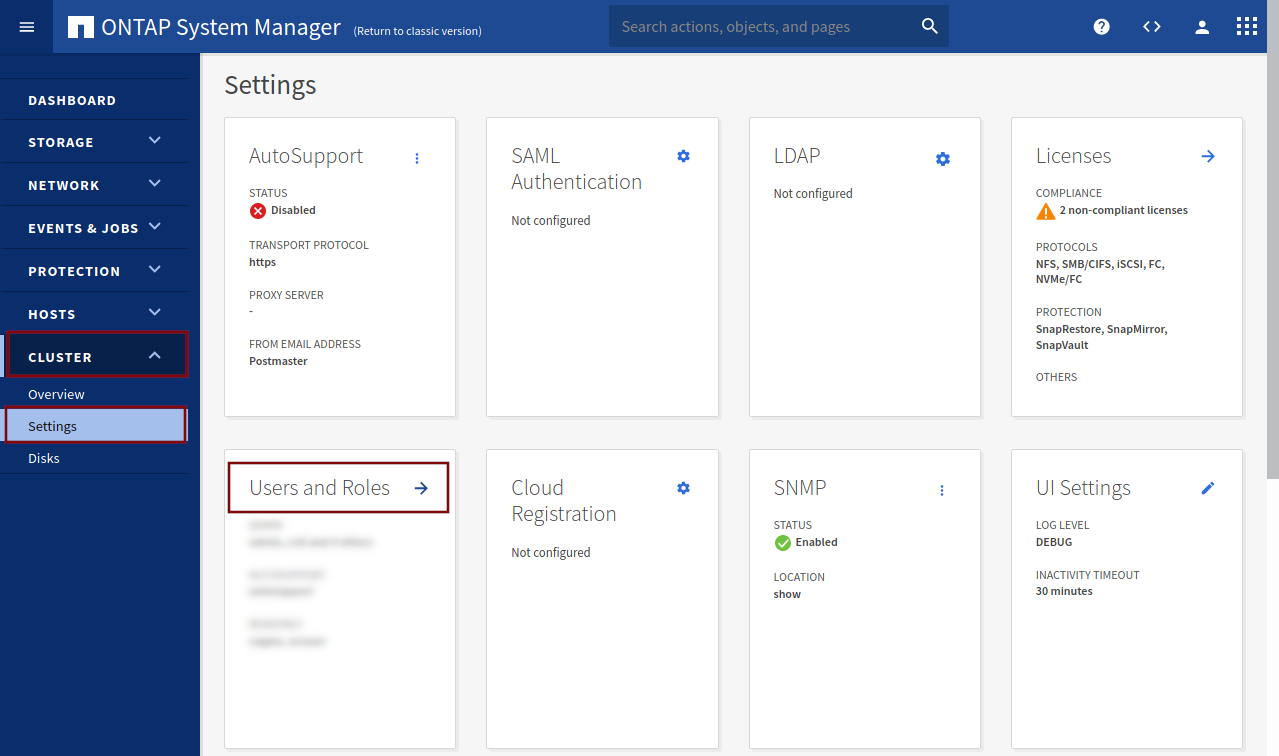
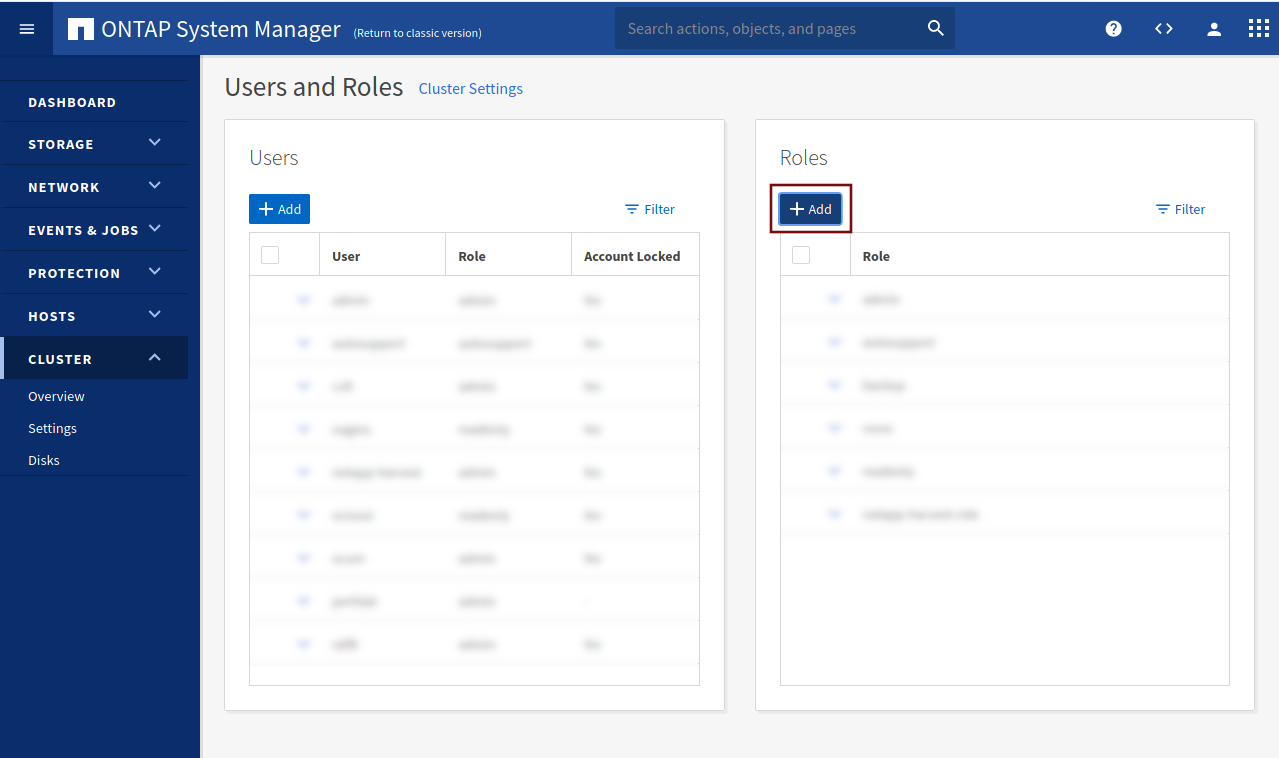
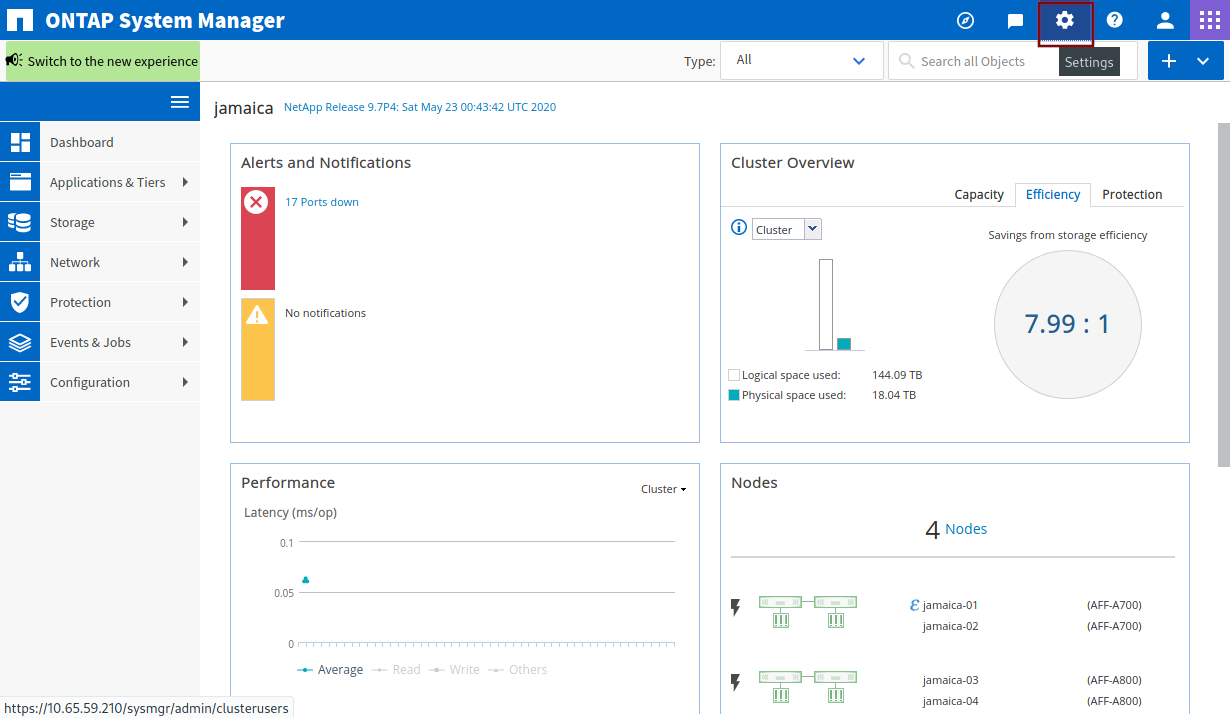
Open System Manager. Click on CLUSTER in the left menu bar, Settings and Users and Roles.
In the right column, under Roles, click on Add to add a new role.
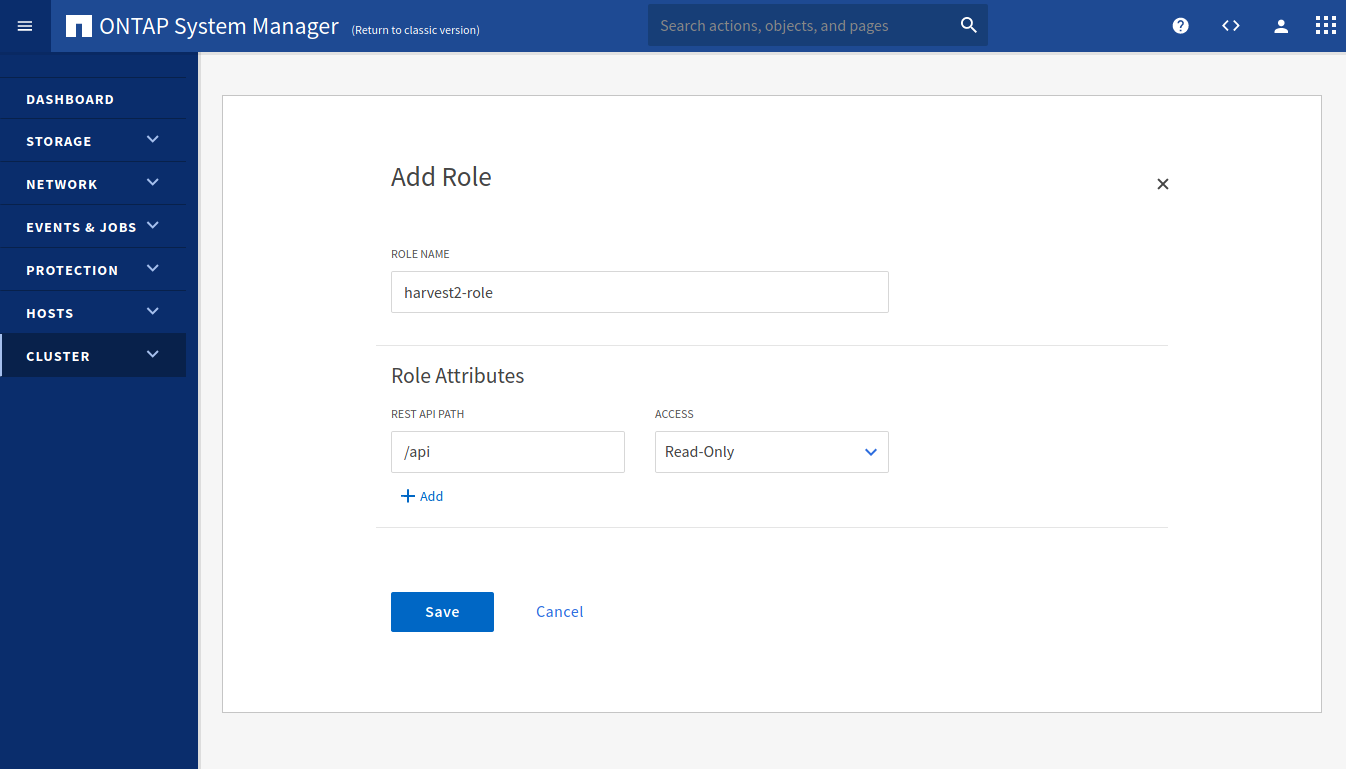
Choose a role name (e.g. harvest2-role). In the REST API PATH field, type /api and select Read-Only for ACCESS. Click on Save.
In the left column, under Users, click on Add to create a new user. Choose a username. Under Role, select the role that we just created. Under User Login Methods select ONTAPI, and select one of the two authentication methods. Type in a password if you chose Password. Click on Save
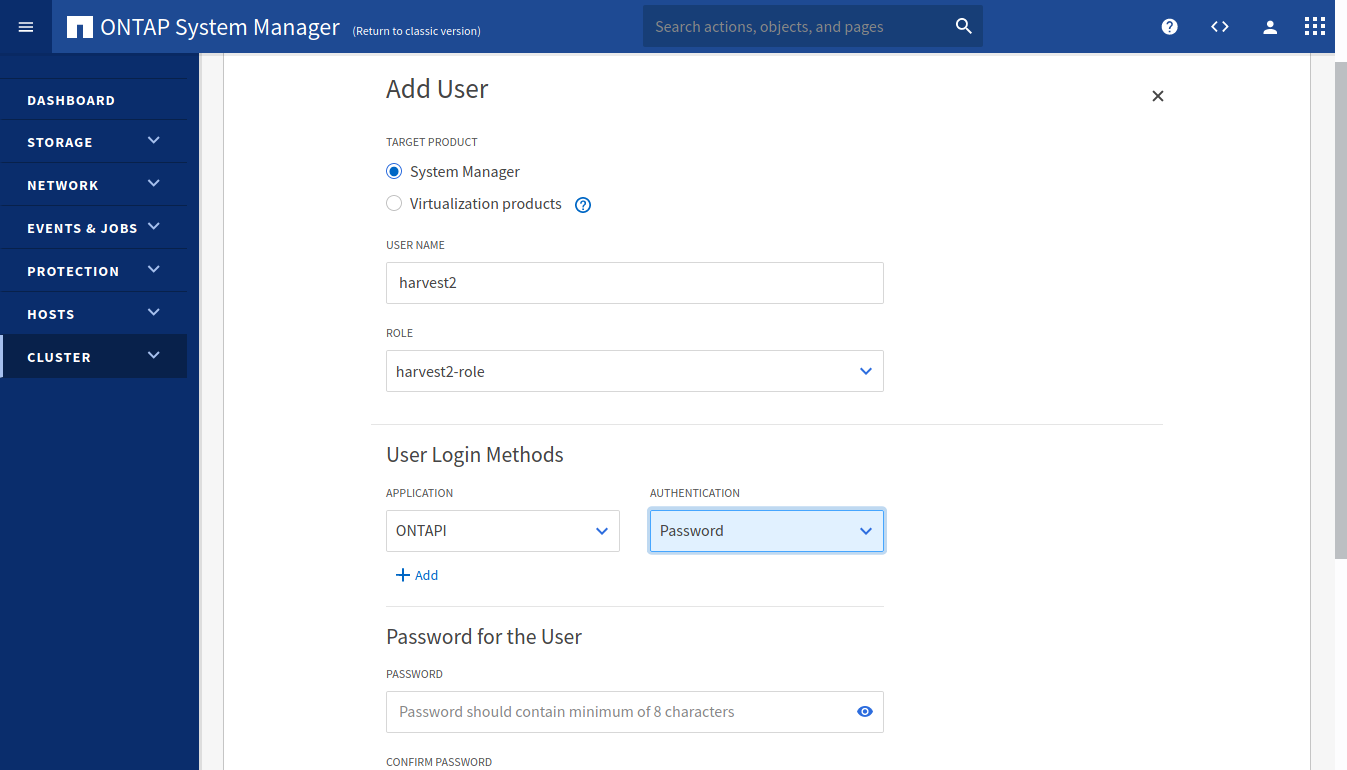
If you chose Password, you can add the username and password to the Harvest configuration file and start Harvest. If you chose Certificate jump to Using Certificate Authentication to generate certificates files.
System Manager: Classic interface
Open System Manager. Click on the Settings icon in the top-right corner of the window.
Click on Roles in the left menu bar and click Add. Choose a role name (e.g. harvest2-role).
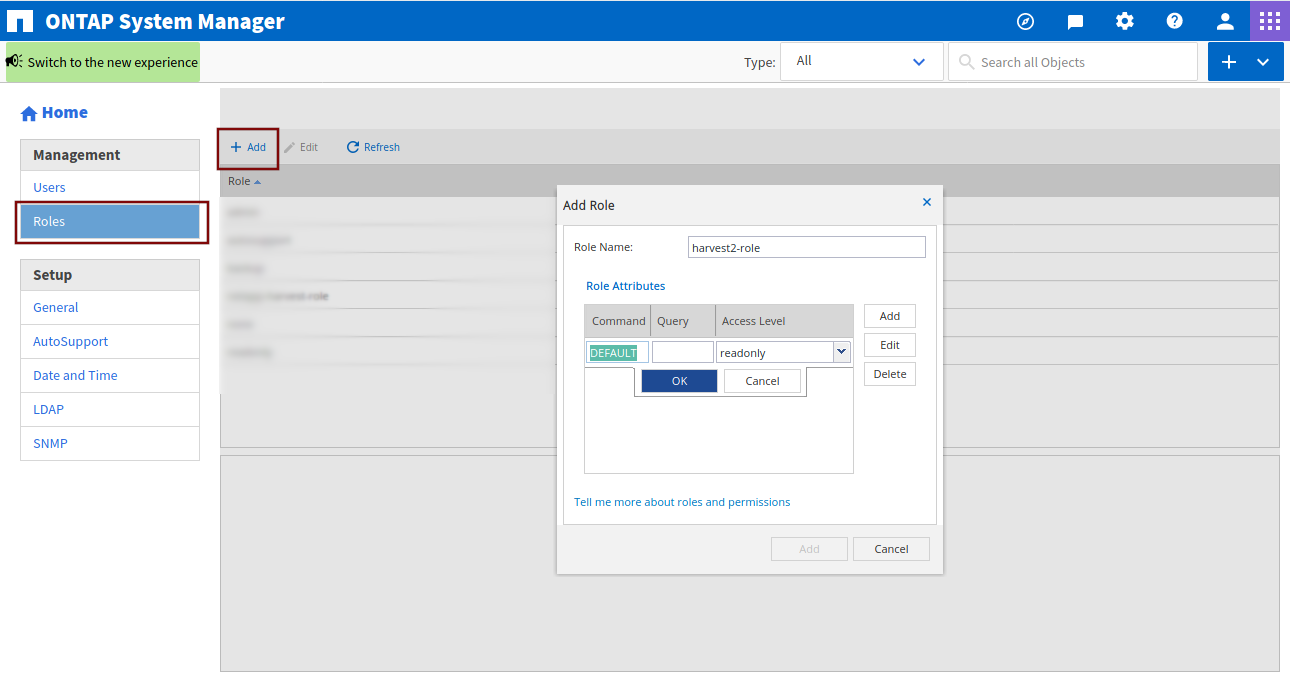
If you want to give Harvest read-only access to all API objects, then under Role Attributes click on Add, under Command type DEFAULT, leave Query empty, select readonly under Access Level, click on OK and Add.
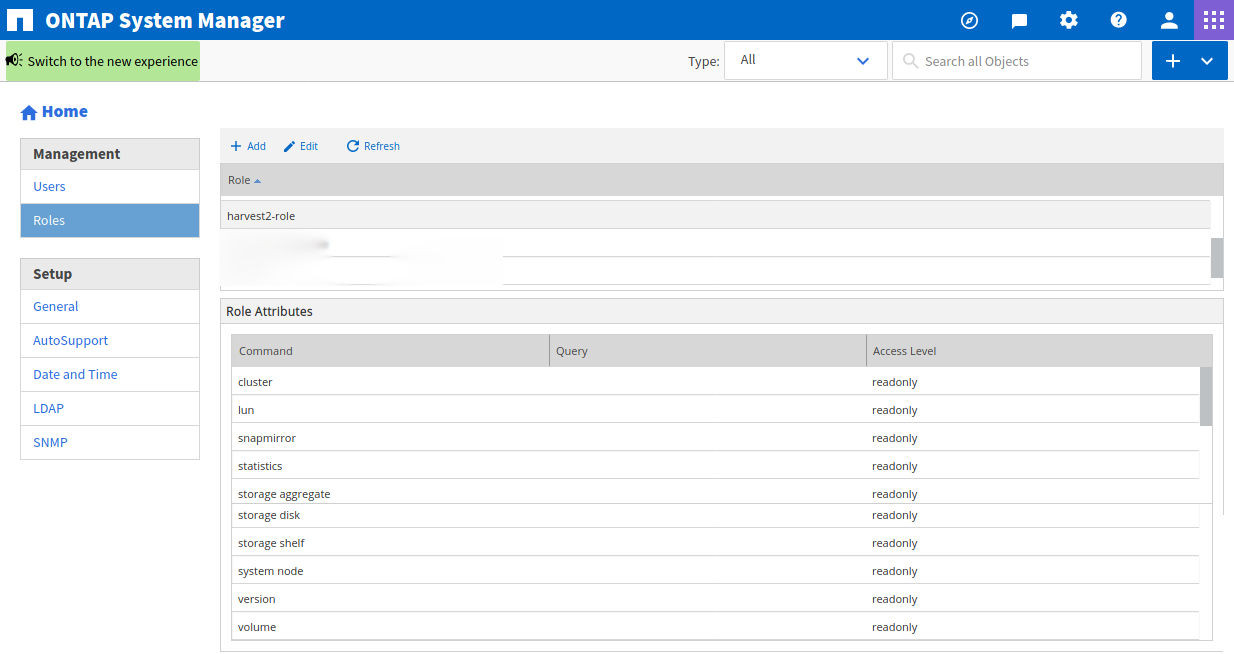
If you want to limit the API objects, then under Role Attributes, add each of the following lines as an entry. All of those should be entered under the Command column, Query should be left blank, and Access Level should be selected readonly.
- cluster
- lun
- snapmirror
- statistics
- storage aggregate
- storage disk
- storage shelf
- system node
- version
- volume
After you click on Add, this is what you should see:
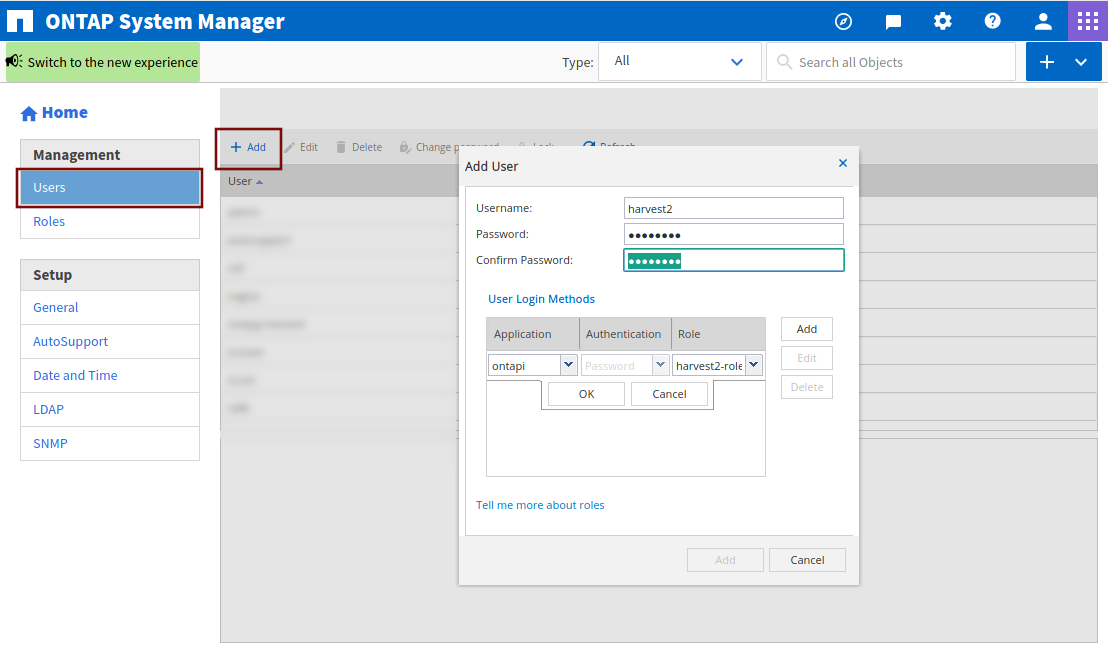
Now we need to create a user. Click on Users in the left menu bar and Add. Choose a username and password. Under User Login Methods, click on Add, select ontapi as Application and select the role that we just created as Role. Click on Add in the pop-up window to save.
Now add the username and password to harvest.yml and start Harvest.
ONTAP CLI
We are going to:
- create a Harvest role with read-only access to the API objects
- create a Harvest user and assign it to that role
You should decide if you want to limit the Harvest role to only the subset of API objects Harvest requires or give Harvest access to all API objects. In both cases, Harvest's access will be read-only.
Either approach is fine, following the principle of least-privilege, we recommend the limited approach.
Login to the CLI of your c-DOT ONTAP system using SSH.
Least-privilege approach
Verify there are no errors when you copy/paste these. Warnings are fine.
security login role create -role harvest2-role -access readonly -cmddirname "cluster"
security login role create -role harvest2-role -access readonly -cmddirname "lun"
security login role create -role harvest2-role -access readonly -cmddirname "qos workload show"
security login role create -role harvest2-role -access readonly -cmddirname "snapmirror"
security login role create -role harvest2-role -access readonly -cmddirname "statistics"
security login role create -role harvest2-role -access readonly -cmddirname "storage aggregate"
security login role create -role harvest2-role -access readonly -cmddirname "storage disk"
security login role create -role harvest2-role -access readonly -cmddirname "storage shelf"
security login role create -role harvest2-role -access readonly -cmddirname "system health status show"
security login role create -role harvest2-role -access readonly -cmddirname "system health subsystem show"
security login role create -role harvest2-role -access readonly -cmddirname "system node"
security login role create -role harvest2-role -access readonly -cmddirname "version"
security login role create -role harvest2-role -access readonly -cmddirname "volume"

# Permissions required for Harvest 22.05+ security dashboard
security login role create -role harvest2-role -access readonly -cmddirname "network interface"
security login role create -role harvest2-role -access readonly -cmddirname "security"
security login role create -role harvest2-role -access readonly -cmddirname "storage encryption disk"
security login role create -role harvest2-role -access readonly -cmddirname "vserver"
All APIs read-only approach
security login role create -role harvest2-role -access readonly -cmddirname "DEFAULT"
Create harvest user and associate to role
Use this for password authentication
# ZAPI based access
security login create -user-or-group-name harvest2 -application ontapi -role harvest2-role -authentication-method password

# REST based access
security login create -user-or-group-name harvest2 -application http -role harvest2-role -authentication-method password
Or this for certificate authentication
# ZAPI based access
security login create -user-or-group-name harvest2 -application ontapi -role harvest2-role -authentication-method cert

# REST based access
security login create -user-or-group-name harvest2 -application http -role harvest2-role -authentication-method cert
Verify that an entry is present by running the following commands
# ZAPI based access
vserver services web access show -role harvest2-role -name ontapi

# REST based access
vserver services web access show -role harvest2-role -name rest
If the entry is missing, enable access by running the following
# ZAPI based access
vserver services web access create -vserver $ADMIN_VSERVER -name ontapi -role harvest2-role

# REST based access
vserver services web access create -vserver $ADMIN_VSERVER -name rest -role harvest2-role
7-Mode CLI
Login to the CLI of your 7-Mode ONTAP system (e.g. using SSH). First, we create a user role. If you want to give the user readonly access to all API objects, type in the following command:
useradmin role modify harvest2-role -a login-http-admin,api-system-get-version, \
api-system-get-info,api-perf-object-*,api-ems-autosupport-log,api-diagnosis-status-get, \
api-lun-list-info,api-diagnosis-subsystem-config-get-iter,api-disk-list-info, \
api-diagnosis-config-get-iter,api-aggr-list-info,api-volume-list-info, \
api-storage-shelf-environment-list-info,api-qtree-list,api-quota-report
Using Certificate Authentication
See comments here for troubleshooting client certificate authentication.
Client certificate authentication allows you to authenticate with your ONTAP cluster without including
username/passwords in your harvest.yml file. The process to setup client certificates is straightforward, although
self-signed certificates introduce more work as does Go's strict treatment of common names.
Unless you've installed production certificates on your ONTAP cluster, you'll need to replace your cluster's common-name-based self-signed certificates with a subject alternative name based certificate. After that step is completed, we'll create client certificates and add those for passwordless login.
If you can't or don't want to replace your ONTAP cluster certificates, there are some workarounds. You can
- Use
use_insecure_tls: truein yourharvest.ymlto disable certificate verification - Change your
harvest.ymlto connect via hostname instead of IP address
Create Self-Signed Subject Alternate Name Certificates for ONTAP
Subject alternate name (SAN) certificates allow multiple hostnames in a single certificate. Starting with Go 1.3, when
connecting to a cluster via its IP address, the CN field in the server certificate is ignored. This often causes errors
like this:
x509: cannot validate certificate for 127.0.0.1 because it doesn't contain any IP SANs
Overview of steps to create a self-signed SAN certificate and make ONTAP use it
- Create a root key
- Create a root certificate authority certificate
- Create a SAN certificate for your ONTAP cluster, using #2 to create it
- Install root ca certificate created in step #2 on cluster
- Install SAN certificate created in step #3 on your cluster
- Modify you cluster/SVM to use the new certificate installed at step #5
Setup
# create a place to store the certificate authority files, adjust as needed
mkdir -p ca/{private,certs}
Create a root key
cd ca
# generate a private key that we will use to create our self-signed certificate authority
openssl genrsa -out private/ca.key.pem 4096
chmod 400 private/ca.key.pem
Create a root certificate authority certificate
Download the sample [samples/openssl.cnf] file and put it in the directory we created in setup. Edit line 9,
changing dir to point to your ca directory created in setup.
openssl req -config openssl.cnf -key private/ca.key.pem -new -x509 -days 7300 -sha256 -extensions v3_ca -out certs/ca.cert.pem

# Verify
openssl x509 -noout -text -in certs/ca.cert.pem

# Make sure these are present
    Signature Algorithm: sha256WithRSAEncryption               <======== Signature Algorithm can not be sha-1
        X509v3 extensions:
            X509v3 Subject Key Identifier:
                --removed
            X509v3 Authority Key Identifier:
                --removed

            X509v3 Basic Constraints: critical
                CA:TRUE                                        <======== CA must be true
            X509v3 Key Usage: critical
                Digital Signature, Certificate Sign, CRL Sign  <======== Digital and certificate signature
Create a SAN certificate for your ONTAP cluster
First, we'll create the certificate signing request and then the certificate. In this example, the ONTAP cluster is
named umeng-aff300-05-06, update accordingly.
Download the sample [samples/server_cert.cnf] file and put it in the directory we created in setup. Edit lines 18-21 to include your ONTAP cluster hostnames and IP addresses. Edit lines 6-11 with new names as needed.
openssl req -new -newkey rsa:4096 -nodes -sha256 -subj "/" -config server_cert.cnf -outform pem -out umeng-aff300-05-06.csr -keyout umeng-aff300-05-06.key

# Verify
openssl req -text -noout -in umeng-aff300-05-06.csr

# Make sure these are present
        Attributes:
        Requested Extensions:
            X509v3 Subject Alternative Name:         <======== Section that lists alternate DNS and IP names
                DNS:umeng-aff300-05-06-cm.rtp.openenglab.netapp.com, DNS:umeng-aff300-05-06, IP Address:10.193.48.11, IP Address:10.193.48.11
    Signature Algorithm: sha256WithRSAEncryption     <======== Signature Algorithm can not be sha-1
We'll now use the certificate signing request and the recently create certificate authority to create a new SAN certificate for our cluster.
openssl x509 -req -sha256 -days 30 -in umeng-aff300-05-06.csr -CA certs/ca.cert.pem -CAkey private/ca.key.pem -CAcreateserial -out umeng-aff300-05-06.crt -extensions req_ext -extfile server_cert.cnf

# Verify
openssl x509 -text -noout -in umeng-aff300-05-06.crt

# Make sure these are present
X509v3 extensions:
            X509v3 Subject Alternative Name:       <======== Section that lists alternate DNS and IP names
                DNS:umeng-aff300-05-06-cm.rtp.openenglab.netapp.com, DNS:umeng-aff300-05-06, IP Address:10.193.48.11, IP Address:10.193.48.11
    Signature Algorithm: sha256WithRSAEncryption   <======== Signature Algorithm can not be sha-1
Install Root CA Certificate On Cluster
Login to your cluster with admin credentials and install the server certificate authority. Copy from ca/certs/ca.cert.pem
ssh admin@IP
umeng-aff300-05-06::*> security certificate install -type server-ca

Please enter Certificate: Press <Enter> when done
-----BEGIN CERTIFICATE-----
...
-----END CERTIFICATE-----

You should keep a copy of the CA-signed digital certificate for future reference.

The installed certificate's CA and serial number for reference:
CA: ntap
Serial: 46AFFC7A3A9999999E8FB2FEB0

The certificate's generated name for reference: ntap
Now install the server certificate we created above with SAN. Copy certificate from ca/umeng-aff300-05-06.crt and private key from ca/umeng-aff300-05-06.key
umeng-aff300-05-06::*> security certificate install -type server

Please enter Certificate: Press <Enter> when done
-----BEGIN CERTIFICATE-----
..
-----END CERTIFICATE-----

Please enter Private Key: Press <Enter> when done
-----BEGIN PRIVATE KEY-----
...
-----END PRIVATE KEY-----

Please enter certificates of Certification Authorities (CA) which form the certificate chain of the server certificate. This starts with the issuing CA certificate of the server certificate and can range up to the root CA certificate.

Do you want to continue entering root and/or intermediate certificates {y|n}: n
If ONTAP tells you the provided certificate does not have a common name in the subject field, type the hostname of the cluster like this:
The provided certificate does not have a common name in the subject field.

Enter a valid common name to continue installation of the certificate:

Enter a valid common name to continue installation of the certificate: umeng-aff300-05-06-cm.rtp.openenglab.netapp.com

You should keep a copy of the private key and the CA-signed digital certificate for future reference.

The installed certificate's CA and serial number for reference:
CA: ntap
Serial: 67A94AA25B229A68AC5BABACA8939A835AA998A58

The certificate's generated name for reference: umeng-aff300-05-06-cm.rtp.openenglab.netapp.com
Modify the admin SVM to use the new certificate
We'll modify the cluster's admin SVM to use the just installed server certificate and certificate authority.
vserver show -type admin -fields vserver,type
vserver            type
------------------ -----
umeng-aff300-05-06 admin

umeng-aff300-05-06::*> ssl modify -vserver umeng-aff300-05-06 -server-enabled true -serial 67A94AA25B229A68AC5BABACA8939A835AA998A58 -ca ntap
  (security ssl modify)
You can verify the certificate(s) are installed and working by using openssl like so:
openssl s_client -CAfile certs/ca.cert.pem -showcerts -servername server -connect umeng-aff300-05-06-cm.rtp.openenglab.netapp.com:443

CONNECTED(00000005)
depth=1 C = US, ST = NC, L = RTP, O = ntap, OU = ntap
verify return:1
depth=0
verify return:1
...
without the -CAfile, openssl will report
CONNECTED(00000005)
depth=0
verify error:num=20:unable to get local issuer certificate
verify return:1
depth=0
verify error:num=21:unable to verify the first certificate
verify return:1
---
Create Client Certificates for Password-less Login
Copy the server certificate we created above into the Harvest install directory.
cp ca/umeng-aff300-05-06.crt /opt/harvest
cd /opt/harvest
Create a self-signed client key and certificate with the same name as the hostname where Harvest is running. It's not
required to name the key/cert pair after the hostname, but if you do, Harvest will load them automatically when you
specify auth_style: certificate_auth otherwise you can point to them directly.
See Pollers for details.
Change the common name to the ONTAP user you setup with the harvest role above. e.g harvest2
cd /opt/harvest
mkdir cert
openssl req -x509 -nodes -days 1095 -newkey rsa:2048 -keyout cert/$(hostname).key -out cert/$(hostname).pem -subj "/CN=harvest2"
Install Client Certificates on Cluster
Login to your cluster with admin credentials and install the client certificate. Copy from cert/$(hostname).pem
ssh admin@IP
umeng-aff300-05-06::*>  security certificate install -type client-ca -vserver umeng-aff300-05-06

Please enter Certificate: Press <Enter> when done
-----BEGIN CERTIFICATE-----
...
-----END CERTIFICATE-----

You should keep a copy of the CA-signed digital certificate for future reference.

The installed certificate's CA and serial number for reference:
CA: cbg
Serial: B77B59444444CCCC

The certificate's generated name for reference: cbg_B77B59444444CCCC
Now that the client certificate is installed, let's enable it.
umeng-aff300-05-06::*> ssl modify -vserver umeng-aff300-05-06 -client-enabled true
  (security ssl modify)
Verify with a recent version of curl. If you are running on a Mac see below.
curl --cacert umeng-aff300-05-06.crt --key cert/$(hostname).key --cert cert/$(hostname).pem https://umeng-aff300-05-06-cm.rtp.openenglab.netapp.com/api/storage/disks
Update Harvest.yml to use client certificates
Update the poller section with auth_style: certificate_auth like this:
  u2-cert:
    auth_style: certificate_auth
    addr: umeng-aff300-05-06-cm.rtp.openenglab.netapp.com
Restart your poller and enjoy your password-less life-style.
macOS
The version of curl installed on macOS up through Monterey is not recent enough to work with self-signed SAN certs.
You will need to install a newer version of curl via Homebrew, MacPorts, source, etc.
Example of failure when running with older version of curl - you will see this
in client auth test step above.
curl --version
curl 7.64.1 (x86_64-apple-darwin20.0) libcurl/7.64.1 (SecureTransport) LibreSSL/2.8.3 zlib/1.2.11 nghttp2/1.41.0

curl --cacert umeng-aff300-05-06.crt --key cert/cgrindst-mac-0.key --cert cert/cgrindst-mac-0.pem https://umeng-aff300-05-06-cm.rtp.openenglab.netapp.com/api/storage/disks

curl: (60) SSL certificate problem: unable to get local issuer certificate
Let's install curl via Homebrew. Make sure you don't miss the message that Homebrew prints about your path.
If you need to have curl first in your PATH, run:
  echo 'export PATH="/usr/local/opt/curl/bin:$PATH"' >> /Users/cgrindst/.bash_profile
Now when we make a client auth request with our self-signed certificate it works! \o/
brew install curl

curl --version
curl 7.80.0 (x86_64-apple-darwin20.6.0) libcurl/7.80.0 (SecureTransport) OpenSSL/1.1.1l zlib/1.2.11 brotli/1.0.9 zstd/1.5.0 libidn2/2.3.2 libssh2/1.10.0 nghttp2/1.46.0 librtmp/2.3 OpenLDAP/2.6.0
Release-Date: 2021-11-10
Protocols: dict file ftp ftps gopher gophers http https imap imaps ldap ldaps mqtt pop3 pop3s rtmp rtsp scp sftp smb smbs smtp smtps telnet tftp
Features: alt-svc AsynchDNS brotli GSS-API HSTS HTTP2 HTTPS-proxy IDN IPv6 Kerberos Largefile libz MultiSSL NTLM NTLM_WB SPNEGO SSL TLS-SRP UnixSockets zstd

curl --cacert umeng-aff300-05-06.crt --key cert/cgrindst-mac-0.key --cert cert/cgrindst-mac-0.pem https://umeng-aff300-05-06-cm.rtp.openenglab.netapp.com/api/storage/disks

{
  "records": [
    {
      "name": "1.1.22",
      "_links": {
        "self": {
          "href": "/api/storage/disks/1.1.22"
        }
      }
    }
}
Change directory to your Harvest home directory (replace /opt/harvest/ if this is not the default):
$ cd /opt/harvest/
Generate an SSL cert and key pair with the following command. Note that it's preferred to generate these files using the
hostname of the local machine. The command below assumes debian8 as our hostname name and harvest2 as the user we
created in the previous step:
openssl req -x509 -nodes -days 1095 -newkey rsa:2048 -keyout cert/debian8.key \
 -out cert/debian8.pem  -subj "/CN=harvest2"
Next, open the public key (debian8.pem in our example) and copy all of its content. Login into your ONTAP CLI and run
this command by replacing CLUSTER with the name of your cluster.
security certificate install -type client-ca -vserver CLUSTER
Paste the public key content and hit enter. Output should be similar to this:
jamaica::> security certificate install -type client-ca -vserver jamaica

Please enter Certificate: Press <Enter> when done
-----BEGIN CERTIFICATE-----
MIIDETCCAfmgAwIBAgIUP9EUXyl2BDSUOkNEcDU0yqbJ29IwDQYJKoZIhvcNAQEL
BQAwGDEWMBQGA1UEAwwNaGFydmVzdDItY2xpMzAeFw0yMDEwMDkxMjA0MDhaFw0y
MzEwMDktcGFueSBMdGQxFzAVBgNVBAMlc3QyLWNsaTMwggEiMA0tcGFueSBGCSqG
SIb3DQEBAQUAA4IBDwAwggEKAoIBAQCVVy25BeCRoGCJWFOlyUL7Ddkze4Hl2/6u
qye/3mk5vBNsGuXUrtad5XfBB70Ez9hWl5sraLiY68ro6MyX1icjiUTeaYDvS/76
Iw7HeXJ5Pyb/fWth1nePunytoLyG/vaTCySINkIV5nlxC+k0X3wWFJdfJzhloPtt
1Vdm7aCF2q6a2oZRnUEBGQb6t5KyF0/Xh65mvfgB0pl/AS2HY5Gz+~L54Xyvs+BY
V7UmTop7WBYl0L3QXLieERpHXnyOXmtwlm1vG5g4n/0DVBNTBXjEdvc6oRh8sxBN
ZlQWRApE7pa/I1bLD7G2AiS4UcPmR4cEpPRVEsOFOaAN3Z3YskvnAgMBAAGjUzBR
MB0GA1UdDgQWBBQr4syV6TCcgO/5EcU/F8L2YYF15jAfBgNVHSMEGDAWgBQr4syV
6TCcgO/5EcU/F8L2YYF15jAPBgNVHRMdfdfwerH/MA0GCSqGSIb^ECd3DQEBCwUA
A4IBAQBjP1BVhClRKkO/M3zlWa2L9Ztce6SuGwSnm6Ebmbs+iMc7o2N9p3RmV6Xl
h6NcdXRzzPAVrUoK8ewhnBzdghgIPoCI6inAf1CUhcCX2xcnE/osO+CfvKuFnPYE
WQ7UNLsdfka0a9kTK13r3GMs09z/VsDs0gD8UhPjoeO7LQhdU9tJ/qOaSP3s48pv
sYzZurHUgKmVOaOE4t9DAdevSECEWCETRETA$Vbn%@@@%%rcdrctru65ryFaByb+
hTtGhDnoHwzt/cAGvLGV/RyWdGFAbu7Fb1rV94ceggE7nh1FqbdLH9siot6LlnQN
MhEWp5PYgndOW49dDYUxoauCCkiA
-----END CERTIFICATE-----


You should keep a copy of the CA-signed digital certificate for future reference.

The installed certificate's CA and serial number for reference:
CA: harvest2
Serial: 3FD1145F2976043012213d3009095534CCRDBD2

The certificate's generated name for reference: harvest2
Finally, we need to enable SSL authentication with the following command (replace CLUSTER with the name of your cluster):
security ssl modify -client-enabled true -vserver CLUSTER
Reference
- https://github.com/jcbsmpsn/golang-https-example