

Neo Core v2.x
WARNING
This page documents legacy v2.x/v3.x deployments. For v4.x, see the Quick Start guide.
NetApp Neo deployment User Quick Start Guide (v2.x)
IMPORTANT
NetApp Neo for M365 Copilot is currently in Private Preview. This means that the connector is not yet fully supported and may have some limitations. The connector requires a license to activate. You can request access to the connector by joining the Early Access Program (EAP). Please book a meeting with the following link to join the EAP: Book a meeting with NetApp.
IMPORTANT
AWS ECS (Fargate) is NOT supported. This is due to the containers being unable to mount shares to the container(s) - a critical requirement of NetApp Neo.
Prerequisites
Network Requirements
- Port 443 open for outbound traffic to the MS Graph API
- Port 8080 open for internal management of the connector
- Port 445 open for SMB file share access
- SMB File Share(s) must be routable to the connector
Software Requirements
- Microsoft 365 Copilot License
- Docker installed on the machine where the connector will be deployed
- Access to the offline tar image of the connector
- (Optional) Docker Compose installed on the machine where the connector will be deployed
- (Optional) Access to a Kubernetes cluster for deployment
Register the connector in Azure Entra
In order for the connector to be able to securely communicate with M365 Copilot.
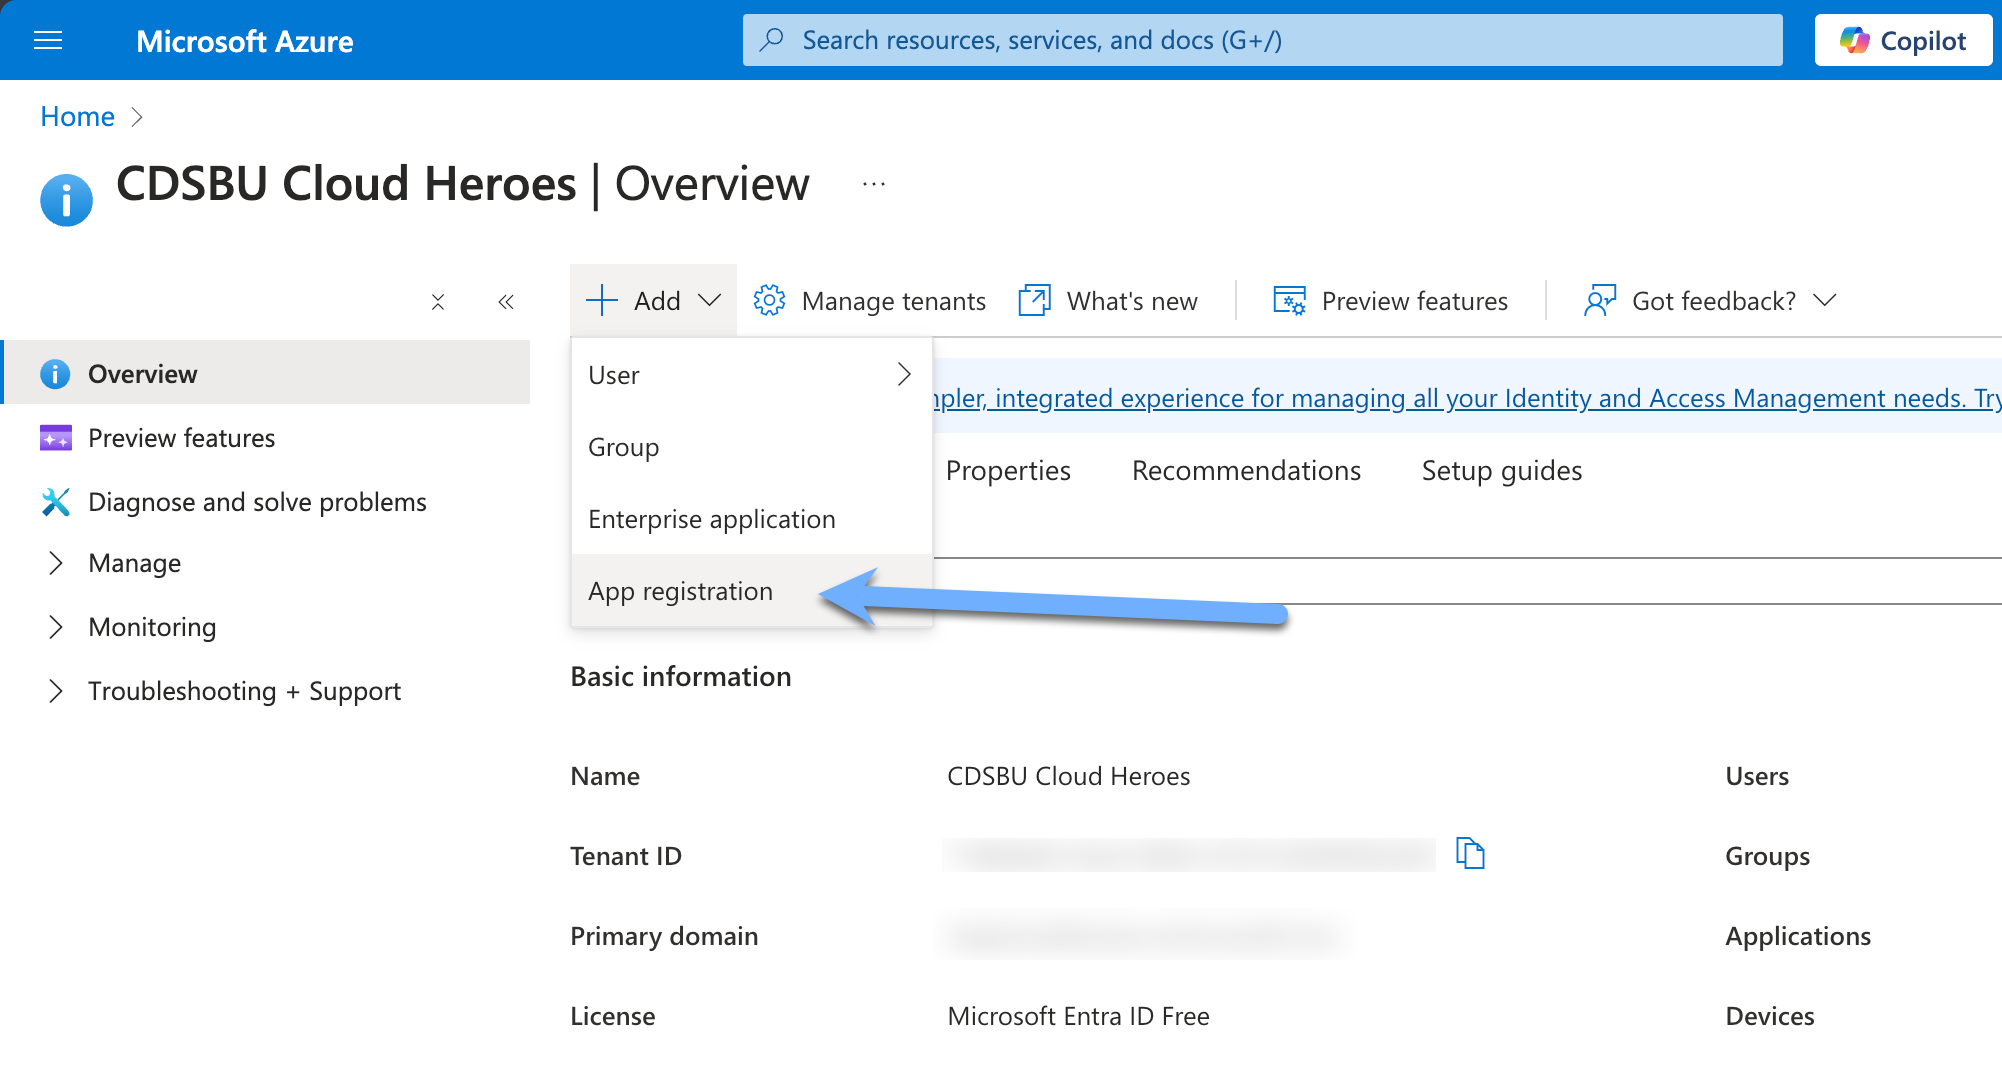
- Navigate to the Azure Entra portal and select "Add" and select the "App Registration" option.
- Fill in the required fields and click "Register". (No Redirect URI is required)
- Copy the Application (client) ID and Directory (tenant) ID from the Overview page.
- Navigate to the "API permissions" page and select "Add a permission".
- Select "Microsoft Graph" and then "Application permissions".
- Search for "ExternalConnection.ReadWrite.OwnedBy" and select the checkbox.
- Search for "ExternalItem.ReadWrite.OwnedBy" and select the checkbox.
- Search for "User.Read" and select the checkbox.
- Search for "User.Read.All" and select the checkbox.
- Search for "Group.Read.All" and select the checkbox
- Click "Add permissions".
- Click "Graph admin consent for (tenant)" and click "Yes".
- Navigate to the "Certificates & secrets" page and click "New client secret".
- Fill in the required fields and click "Add".
- Copy the value of the client secret.
You have successfully registered the connector in Azure ENTRA. You will need the Application ID, Directory ID, and Client Secret for the next steps.
Getting Started
The easiest way to get started is by using the pre-built container image. You can run the connector using Docker/Podman or deploy it to a Kubernetes cluster using Helm.
Deploy using Docker/Podman
Pull the image
docker pull ghcr.io/netapp/netapp-copilot-connector:2.2.5TIP
Neo v2.x latest and last GA version is 2.2.5.
Configure and Run
Download the compose file sample:
- Download the docker-compose.yml file and rename it to your liking
Configure the
.envfile with the required environment variables:
# Database configuration
DB_PATH=app/data/database.db # Optional: Default is data/database.db

# Application Settings
PORT=8080 # Optional: Default is 8080

# JWT configuration for authentication
JWT_SECRET_KEY=your-secret-key-here # Optional: Default is a 32-byte random key
JWT_ALGORITHM=HS256 # Optional: Default is HS256
ACCESS_TOKEN_EXPIRE_MINUTES=30 # Optional: Default is 30 minutes

# NetApp Settings
NETAPP_CONNECTOR_LICENSE=your-licence-key-here # Mandatory

# Microsoft Graph configuration
MS_GRAPH_CLIENT_ID=your-client-id-here # Mandatory
MS_GRAPH_CLIENT_SECRET=your-client-secret-here # Mandatory
MS_GRAPH_TENANT_ID=your-tenant-id-here # Mandatory

# Optional: Override default connector configuration
MS_GRAPH_CONNECTOR_ID=netappcopilot # Optional: Default is netappcopilot
MS_GRAPH_CONNECTOR_NAME="NetApp Connector" # Optional: Default is "NetApp Connector"
MS_GRAPH_CONNECTOR_DESCRIPTION="NetApp Connector for Microsoft 365 Copilot" # Optional: Default is "NetApp Connector for Microsoft 365 Copilot"- Review the compose file and run the connector using Docker Compose:
services:
  db: # PostgreSQL database service - Optional - only needed if you don't have an existing PostgreSQL database and want to quickly get started. If you have an existing PostgreSQL database, you can skip this service and configure the NEO service to connect to your existing database. Simply remove the 'db' service and update the NEO service's environment variables to point to your existing database.
    image: postgres
    restart: always
    shm_size: 128mb # Adjust shared memory size if needed, this is important for database performance and 128mb is a good starting point for POC setups.
    environment:
      POSTGRES_PASSWORD: password # use a strong password
      POSTGRES_DB: neo
      PGDATA: /var/lib/postgresql/18/docker # PostgreSQL 18+ uses version-specific PGDATA path
    volumes:
      - postgres_data:/var/lib/postgresql # PostgreSQL 18+ mounts at /var/lib/postgresql (not /data subdirectory)
    networks:
      - netapp-neo
  neo:
    image: ghcr.io/netapp/netapp-copilot-connector:latest # Alternatively, you can specify a specific version tag i.e. 2.1.7
    # deploy: # Uncomment this section to enable GPU support
    #   resources:
    #     reservations:
    #       devices:
    #         - driver: nvidia
    #           count: 1 # Adjust count based on your GPU availability
    #           capabilities: [gpu]
    cap_add:
      - SYS_ADMIN
      - DAC_READ_SEARCH
      - DAC_OVERRIDE
    security_opt:
      - apparmor:unconfined
    ports:
      - "8081:8080"
    environment:
      - PORT=8080
      - DATABASE_URL=postgresql://postgres:password@db:5432/neo # Update with your DB credentials if needed. For mySQL use: mysql://user:password@tcp(db:3306)/neo
    restart: unless-stopped
    networks:
      - netapp-neo
    depends_on: # Ensure the database starts before NEO - Remove this section if you're using an existing database externally
      - db

  neoui:
    image: ghcr.io/beezy-dev/neo-ui-framework:3.1.0
    container_name: neoui
    ports:
      - "8080:80"
    environment:
      - NEO_API=http://neo:8080
    networks:
      - netapp-neo
    restart: unless-stopped
    depends_on:
      - neo

networks:
  netapp-neo:
    driver: bridge

volumes: # Remove this section if you're using an external database
  postgres_data:
driver: localdocker-compose up -d- Access the connector
The connector will be deployed and will be accessible on port 8080. You can access the API documentation at http://localhost:8080/docs.
Trouble deploying the connector? Check the Troubleshooting section for common issues.
Deploy using Kubernetes and Helm Chart
This Helm chart deploys NetApp Neo for Microsoft 365 Copilot on a Kubernetes cluster using a StatefulSet for stable, persistent storage.
Overview
The chart bootstraps a deployment of NetApp Neo, which includes the following Kubernetes resources:
- StatefulSet: Manages the connector pod, ensuring stable network identity and storage.
- PersistentVolumeClaim: Provides persistent storage for connector data (e.g., database).
- Service: Exposes the connector within the cluster on a stable endpoint.
- Secret: Securely stores sensitive credentials like Microsoft Graph API keys and the NetApp license.
- ConfigMap: Manages non-sensitive environment variables and configuration.
- Ingress: (Optional) Manages external access to the connector service.
Prerequisites
- Kubernetes cluster (v1.19+ recommended)
- Helm package manager (v3+)
- A default StorageClass configured in your cluster for PersistentVolume provisioning.
Installation Guide
Add Helm Repository
First, add the NetApp Innovation Labs repository to your Helm client.
helm repo add innovation-labs https://netapp.github.io/Innovation-Labs/Install the Chart
There are two primary methods for installing the chart: using command-line flags (ideal for testing) or a custom values file (recommended for production).
Method 1: Using Command-Line Flags (for Development)
For quick tests, you can pass parameters directly using the --set flag.
helm install netapp-connector innovation-labs/netapp-connector --version 26.10.4 \
  --namespace netapp-connector \
  --create-namespace \
  --set main.credentials.MS_GRAPH_CLIENT_ID="<your-graph-client-id>" \
  --set main.credentials.MS_GRAPH_CLIENT_SECRET="<your-graph-client-secret>" \
  --set main.credentials.MS_GRAPH_TENANT_ID="<your-graph-tenant-id>" \
  --set main.credentials.NETAPP_CONNECTOR_LICENSE="<your-license-key>"
Method 2: Using a Custom Values File (Recommended for Production)
For production environments, it is highly recommended to use a custom values.yaml file to manage your configuration. This makes your deployment more readable, repeatable, and easier to manage in version control.
Create a file named
my-values.yamlwith your configuration:yaml# my-values.yaml main: # --- Required Credentials --- credentials: MS_GRAPH_CLIENT_ID: "<your-graph-client-id>" MS_GRAPH_CLIENT_SECRET: "<your-graph-client-secret>" MS_GRAPH_TENANT_ID: "<your-graph-tenant-id>" NETAPP_CONNECTOR_LICENSE: "<your-license-key>" # --- Optional Ingress Configuration --- ingress: enabled: true host: "connector.your-domain.com" # className: "nginx" # Uncomment and set your IngressClass if needed tls: - secretName: my-connector-tls-secret hosts: - connector.your-domain.comWARNING
Do not commit
my-values.yamlwith plain-text secrets to a public version control repository. Use a secret management tool like Azure Key Vault, HashiCorp Vault, or SOPS for handling sensitive data in production.Install the chart using your custom values file:
shhelm install netapp-connector innovation-labs/netapp-connector \ --namespace netapp-connector \ --create-namespace \ -f my-values.yaml
IMPORTANT
The connector will not start correctly without the four mandatory main.credentials values being set, regardless of the installation method.
Upgrading the Chart
To upgrade an existing release, use helm upgrade. The --reuse-values flag is recommended to preserve your existing configuration, including secrets. You can then override specific values, like the image tag.
# 1. Update your local chart repository
helm repo update

# 2. Upgrade the release to a new version (e.g., 2.2.5)
helm upgrade netapp-connector innovation-labs/netapp-connector \
  --namespace netapp-connector \
  --reuse-values \
  --set main.image.tag="2.2.5"
Uninstallation
To uninstall and delete the netapp-connector release:
helm uninstall netapp-connector --namespace netapp-connectorNOTE
This command removes the StatefulSet, Service, and other resources but does not delete the PersistentVolumeClaim (PVC). Your data will be preserved. To permanently delete all data, you must manually delete the PVC.
Configuration Parameters
The following table lists the configurable parameters of NetApp Neo chart and their default values.
| Parameter | Description | Default |
|---|---|---|
main.name | The base name for all created resources. | netapp-connector-main |
main.replicaCount | Number of connector pods to run. Only 1 is supported. | 1 |
main.image.repository | The container image repository. | ghcr.io/netapp/netapp-copilot-connector |
main.image.tag | The container image tag. If empty, defaults to the chart's appVersion. | "" |
main.image.pullPolicy | The image pull policy. | Always |
main.service.type | The type of Kubernetes service to create. | ClusterIP |
main.service.port | The port exposed by the service and container. | 8080 |
main.ingress.enabled | If true, create an Ingress resource. | false |
main.ingress.host | The hostname for the Ingress rule. Required if Ingress is enabled. | nil |
main.ingress.path | The path for the Ingress rule. | / |
main.ingress.pathType | The path type for the Ingress rule (Prefix, Exact, ImplementationSpecific). | Prefix |
main.ingress.className | The ingressClassName to associate with the Ingress. | "" |
main.ingress.tls | Ingress TLS configuration (list of objects with secretName and hosts). | [] |
main.persistence.enabled | If true, create a PersistentVolumeClaim. | true |
main.persistence.accessMode | The access mode for the PVC. | ReadWriteOnce |
main.persistence.size | The size of the persistent volume. | 1Gi |
main.persistence.mountPath | The path inside the container where the volume is mounted. | /app/data |
main.env.* | Non-sensitive environment variables. See values.yaml for all options. | (various) |
main.credentials.* | Sensitive credentials stored in a Secret. Must be provided by the user. | (placeholders) |
For more information, see the official Helm documentation and Kubernetes documentation.
Initial Setup and First Admin User
IMPORTANT
A dedicated stand-alone desktop UI is available for Windows, MacOS and Linux: Download the Desktop App.
The easiest way to set up the connector and create your first admin user is through the desktop application. The desktop app provides a user-friendly interface for:
- User management
- Adding and configuring SMB shares
- Monitoring crawl progress
- Managing connector settings
Alternatively, you can use the API directly by accessing the interactive documentation at http://localhost:8080/docs
Adding Your First Share
When configuring your first SMB share (either through the desktop app or API), you'll need to provide the following information:
Required Configuration
- Share Path: The UNC path to your SMB share (e.g.,
\\server\share) - Authentication: Domain username and password for accessing the share
- Kerberos Settings: Your Active Directory realm (e.g.,
YOUR.REALM.DOMAIN) - Crawl Schedule: When to automatically scan for new/changed files (e.g., daily at 2 AM)
File Processing Rules
Configure how the connector should process files in your share:
File Filtering Options:
- Include Patterns: Only process specific file types or paths (e.g.,
*.pdf,*.docx,**/reports/**) - Exclude Patterns: Skip certain files or directories (e.g.,
*.tmp,.git/*,**/temp/**) - File Size Limits: Set minimum and maximum file sizes to process
Content Management:
- Copilot Upload: Choose whether to upload files to Microsoft 365 Copilot for search
- Content Persistence: Decide whether to keep extracted content in the local database after upload
Common Configuration Scenarios
Scenario 1: Office Documents Only
- Include patterns:
*.pdf,*.docx,*.xlsx,*.pptx - Enable Copilot upload for searchability
Scenario 2: Database-Only Archive
- Include specific file types or paths
- Disable Copilot upload to keep content local only
Scenario 3: Full Share with Exclusions
- Exclude temporary files, system folders, and backups
- Process all other content types
Triggering Your First Crawl
After adding a share, you can trigger an immediate crawl to test the configuration and start indexing files:
Starting a Crawl
- Desktop App: Use the "Start Crawl" button next to your configured share, or wait for the scheduled crawl to run
- API: Use the crawl endpoint for the specific share
Monitoring Progress
You can monitor the crawl progress through:
- Real-time Status: View current crawl status, files processed, and any errors
- Crawl Statistics: See total files found, successfully processed, and completion time
- Error Reporting: Identify any files or directories that couldn't be accessed
What Happens During a Crawl
- Discovery: The connector scans the share for files matching your configured rules
- Content Extraction: Text content is extracted from supported file types
- ACL Processing: File permissions are analyzed and mapped to Microsoft Entra users/groups
- Upload: Files are uploaded to Microsoft Graph (if enabled) for Copilot integration
- Database Storage: File metadata and content are stored in the local database
Viewing Results in Microsoft 365 Copilot
WARNING
You must perform this step after you have added your first share and completed at least one successful crawl to see results in Microsoft 365 Copilot.
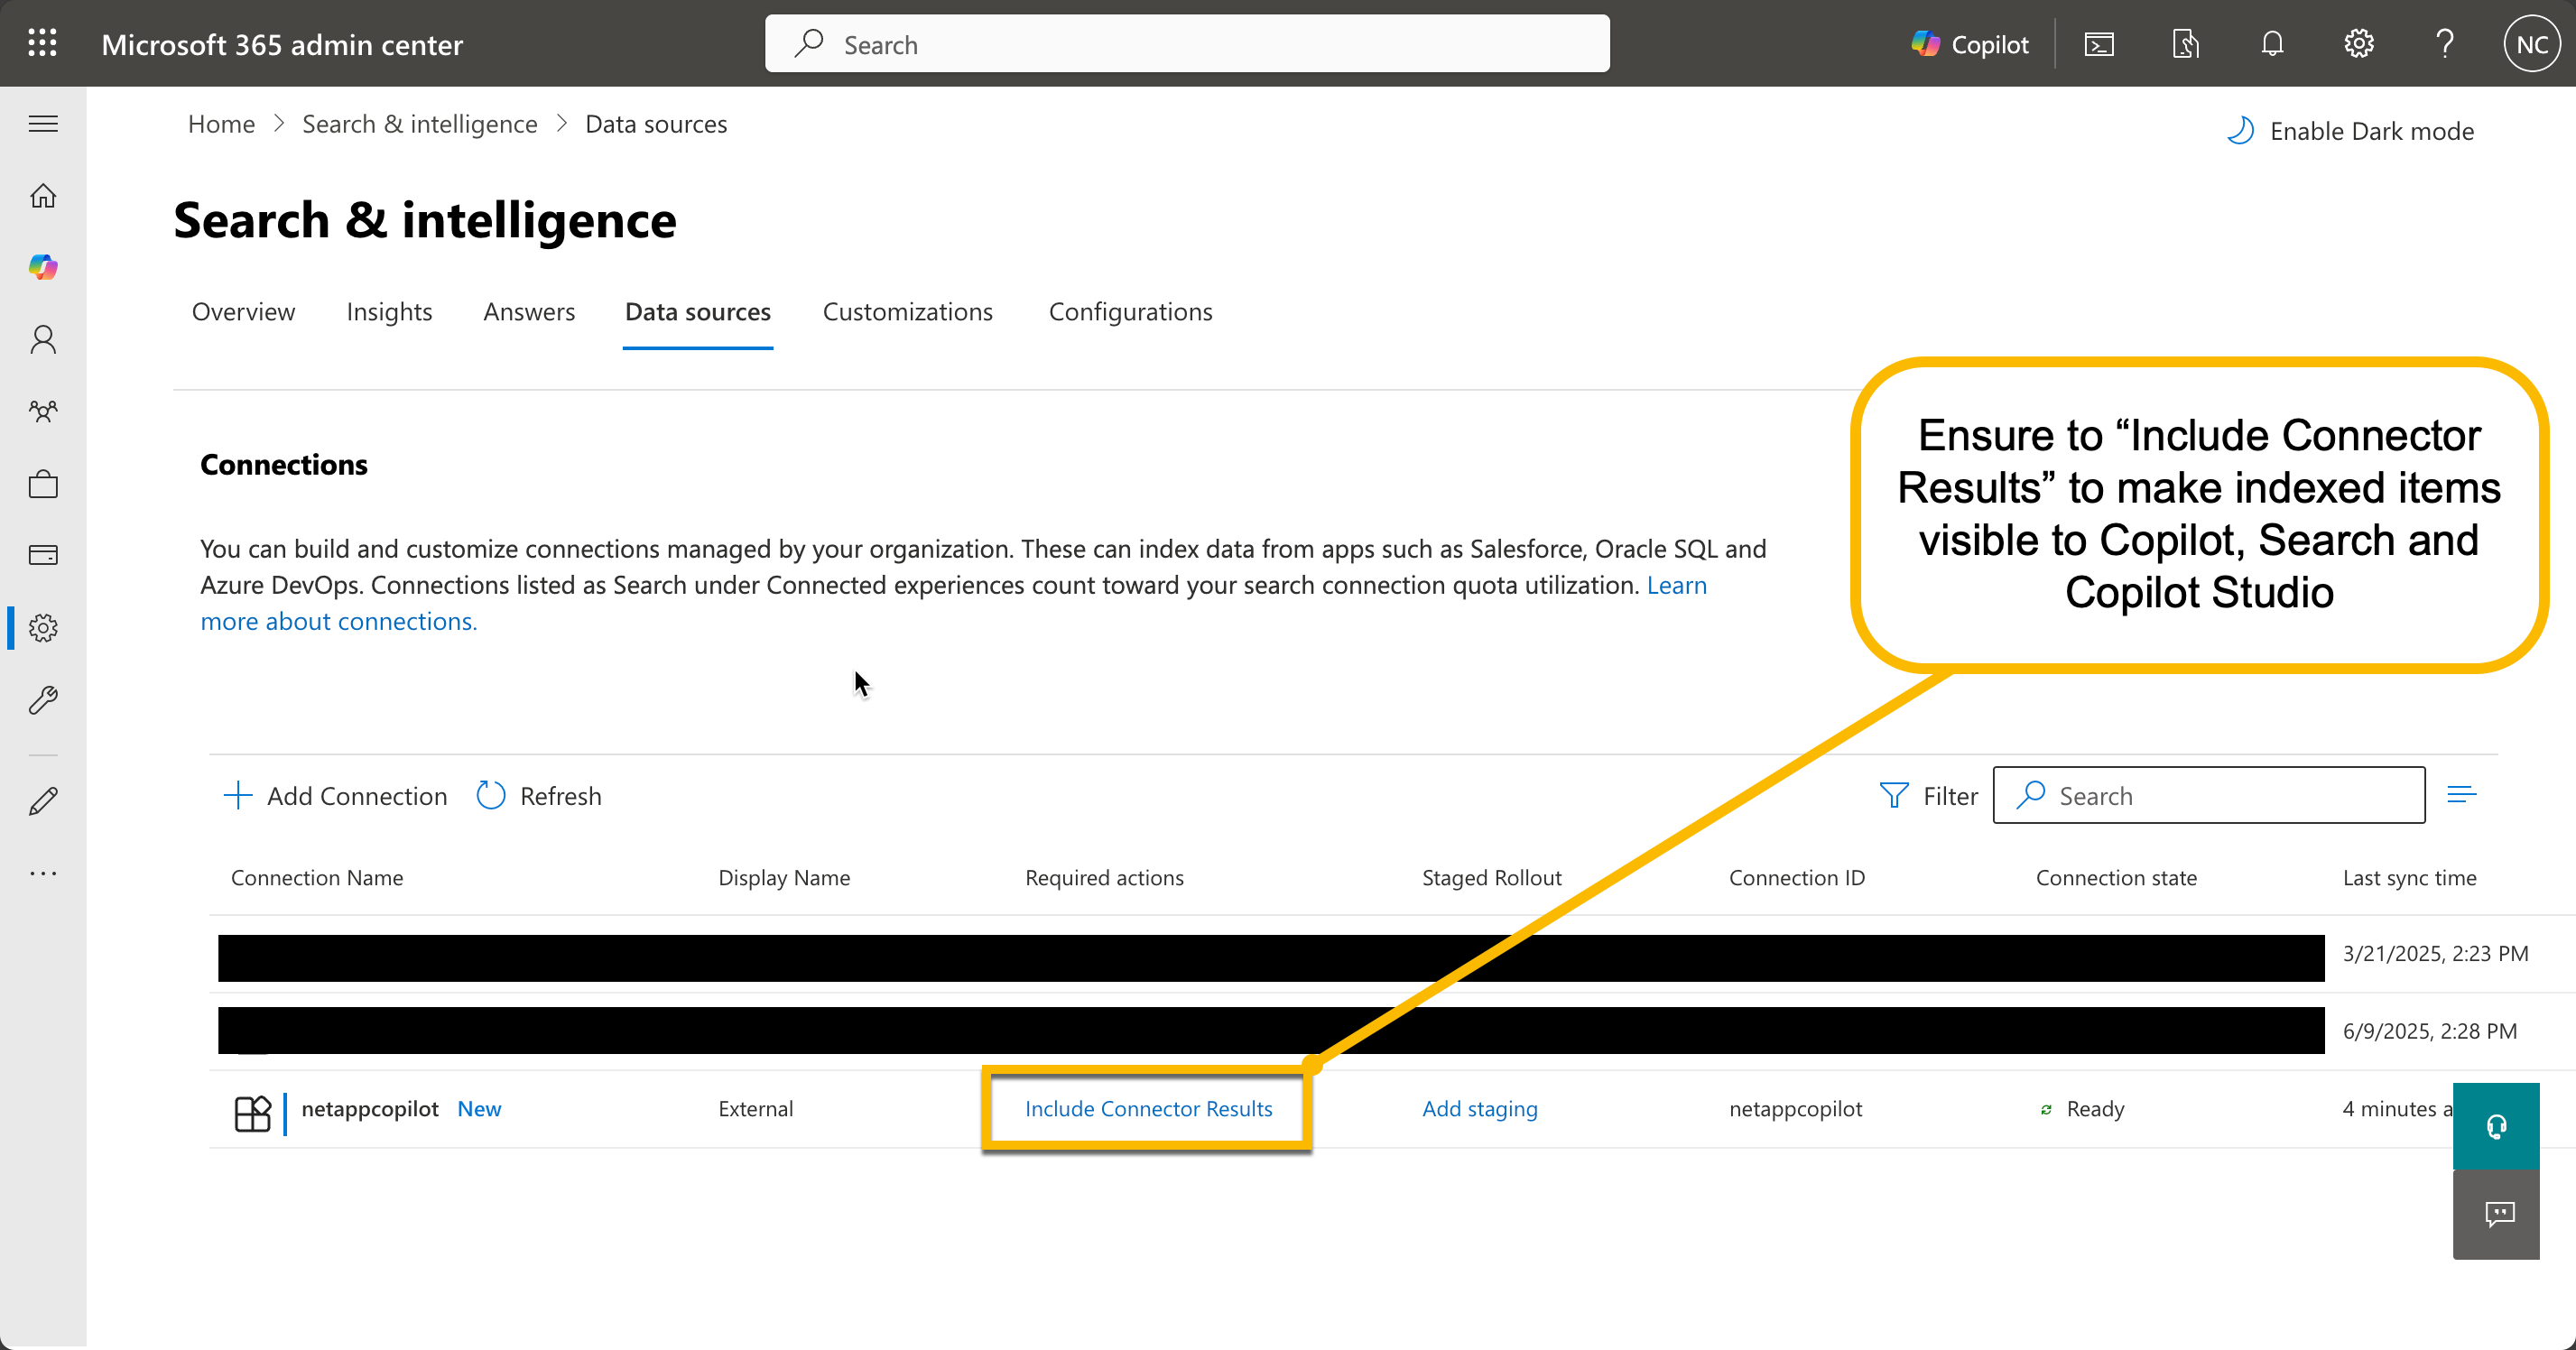
- Visit the Microsoft 365 Admin Center: Go to Search and Intelligence
- Enable Connector Results: Ensure you have selected Include Connector Results for NetApp Neo
- Test in Microsoft 365 Copilot: Try searching for content from your indexed files using natural language queries
- Control Access: Verify that search results respect the original file permissions from your SMB shares. Item level permissions will be attempted to be preserved based on the ACLs read during the crawl, however this may not always be possible depending on your environment and configuration. It is recommended to test access with different user accounts to ensure proper security. In addition to item level permissions, you can also configure (recommended) broader access controls using Microsoft Entra groups and roles using the Microsoft 365 Admin Center -> Copilot Connectors settings -> Staging Permissions to control users and groups that can access content from the connector.
Troubleshooting Common Issues
Authentication Issues
- Ensure
realmmatches your Active Directory domain exactly - Verify
use_kerberosis set to"required" - Check that the user account has access to the SMB share
Content Extraction Issues
- Check logs for extractor information
- For GPU acceleration, ensure proper GPU runtime is installed
- Verify file types are supported by the extractors
Database Issues
- For multi-container deployments, ensure
ENCRYPTION_KEYis set consistently across all nodes - Monitor database size using the
/database/sizeendpoint - Check database connectivity if using PostgreSQL/MySQL
Microsoft Graph Issues
- Verify all Graph API credentials are correct
- Check proxy configuration if behind corporate firewall
- Ensure connector is enabled in Microsoft 365 Admin Center
Advanced Configuration
Proxy Configuration
For corporate environments with proxy servers:
# HTTP/HTTPS proxy
HTTPS_PROXY=http://proxy.company.com:8080
HTTP_PROXY=http://proxy.company.com:8080

# Proxy authentication (optional)
PROXY_USERNAME=proxy_user
PROXY_PASSWORD=proxy_password

# SSL configuration
GRAPH_VERIFY_SSL=true
GRAPH_TIMEOUT=30
SSL Inspection Firewalls
For environments with SSL inspection:
# Option 1: Disable SSL verification (less secure)
GRAPH_VERIFY_SSL=false

# Option 2: Custom CA bundle (recommended)
SSL_CERT_FILE=/app/data/custom_ca_bundle.pem
API Access
NetApp Neo provides a comprehensive REST API for programmatic access. The interactive API documentation is available at http://localhost:8080/docs after starting the connector.
For detailed API usage examples and advanced operations, please refer to our API User Guide.
Firewall Permissions
If your organization's proxy or firewalls block communication to unknown domains, add the following rules to the 'allow' list:
| M365 Enterprise | M365 Government (GCC) | M365 GCCH |
|---|---|---|
| *.office.com | *.office.com | *.office.com, *.office365.us |
| https://login.microsoftonline.com | https://login.microsoftonline.com | https://login.microsoftonline.com, https://login.microsoftonline.us |
| https://graph.microsoft.com/ | https://graph.microsoft.com/ | https://graph.microsoft.com/, https://graph.microsoft.us/ |
| https://huggingface.co/ds4sd/docling-models/ | https://huggingface.co/ds4sd/docling-models/ | https://huggingface.co/ds4sd/docling-models/ |
Support
If you have any feedback or questions regarding NetApp Neo or its Documentation, please reach out to us by opening a GitHub issue at NetApp Innovation Labs.
Version: 2.2.5 Last Updated: 2025-10-09